


If you wish to shop the items featured in this post, Amazon affiliate links are embedded below.
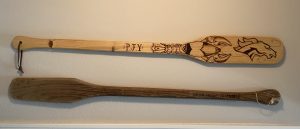
A few years ago, a friend shared a post on Facebook about custom-decorated crawfish paddles. I immediately ordered one for my husband, a New Orleans transplant from Colorado and a lifelong Broncos fan. The custom artwork included a crawfish design that incorporated the Broncos as well. He absolutely loved it. Unfortunately, a knot in the wood caused the paddle to snap a few years later. Since it was still a work of art, we decided to display it in our home, along with the crawfish paddle my late dad had used for years.

I recently walked past the paddles and wondered how difficult it would be to design one of my own. I’ve always been a pretty crafty person, but that hobby has taken a backseat since we started our family. With a 2-year-old, a 1-year-old, and another one on the way this summer, there simply isn’t much time to dedicate to crafting. But I do still have a “craft closet” in our spare bedroom that’s full of supplies in case the urge strikes. I happened to have a beginner’s woodburning kit in there, so I decided to try my hand at it. The kit I have is the Creative Versa Tool, which is available for around $30 on Amazon and at craft stores.

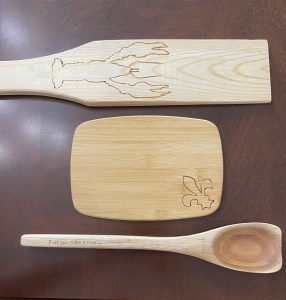
I bought a $13 crawfish paddle at Academy. I also purchased a few other wooden items on Amazon that I thought might make nice personalized gifts if this whole woodburning thing worked out: an $8 roux spoon and a $15 set of cutting boards.
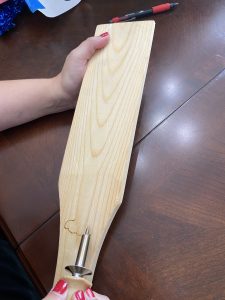
I have a Silhouette machine (like the Cricut machine) that I could’ve used to make a custom stencil, but I wanted to try woodburning in a way that didn’t require something so specific. So instead, I used a simple printed Word document that I taped and traced onto the wooden items using a pen. If this is the route you choose, be sure to select a font that isn’t too intricate to trace (and later burn). I learned the hard way that fonts in all caps are probably the easiest to work with. Keep in mind that the end result will likely look a bit “rustic” since you are doing this by hand.
Some ideas for designs could be a name or nickname, a significant date, a logo, a child’s artwork, or even tracing a loved one’s handwriting.
Once your design is marked onto your wooden surface, it’s time to get burning! Since the woodburning tool gets very, very hot, I do not recommend letting young children use it. Use extreme care when handling the tool. Simply go over your traced design with the woodburning tool until it’s complete. The longer the tip of the tool rests on the wood, the darker that spot will be, so I found it easiest to go through the design first and then go back over it again to darken it. The natural ridges in the wood make it harder to make a straight or fluid line, so I had to go slower in those areas.
And that’s it! Your one-of-a-kind gift will surely be treasured for many years to come.

 Family Valentine Tradition")


